
The essentials
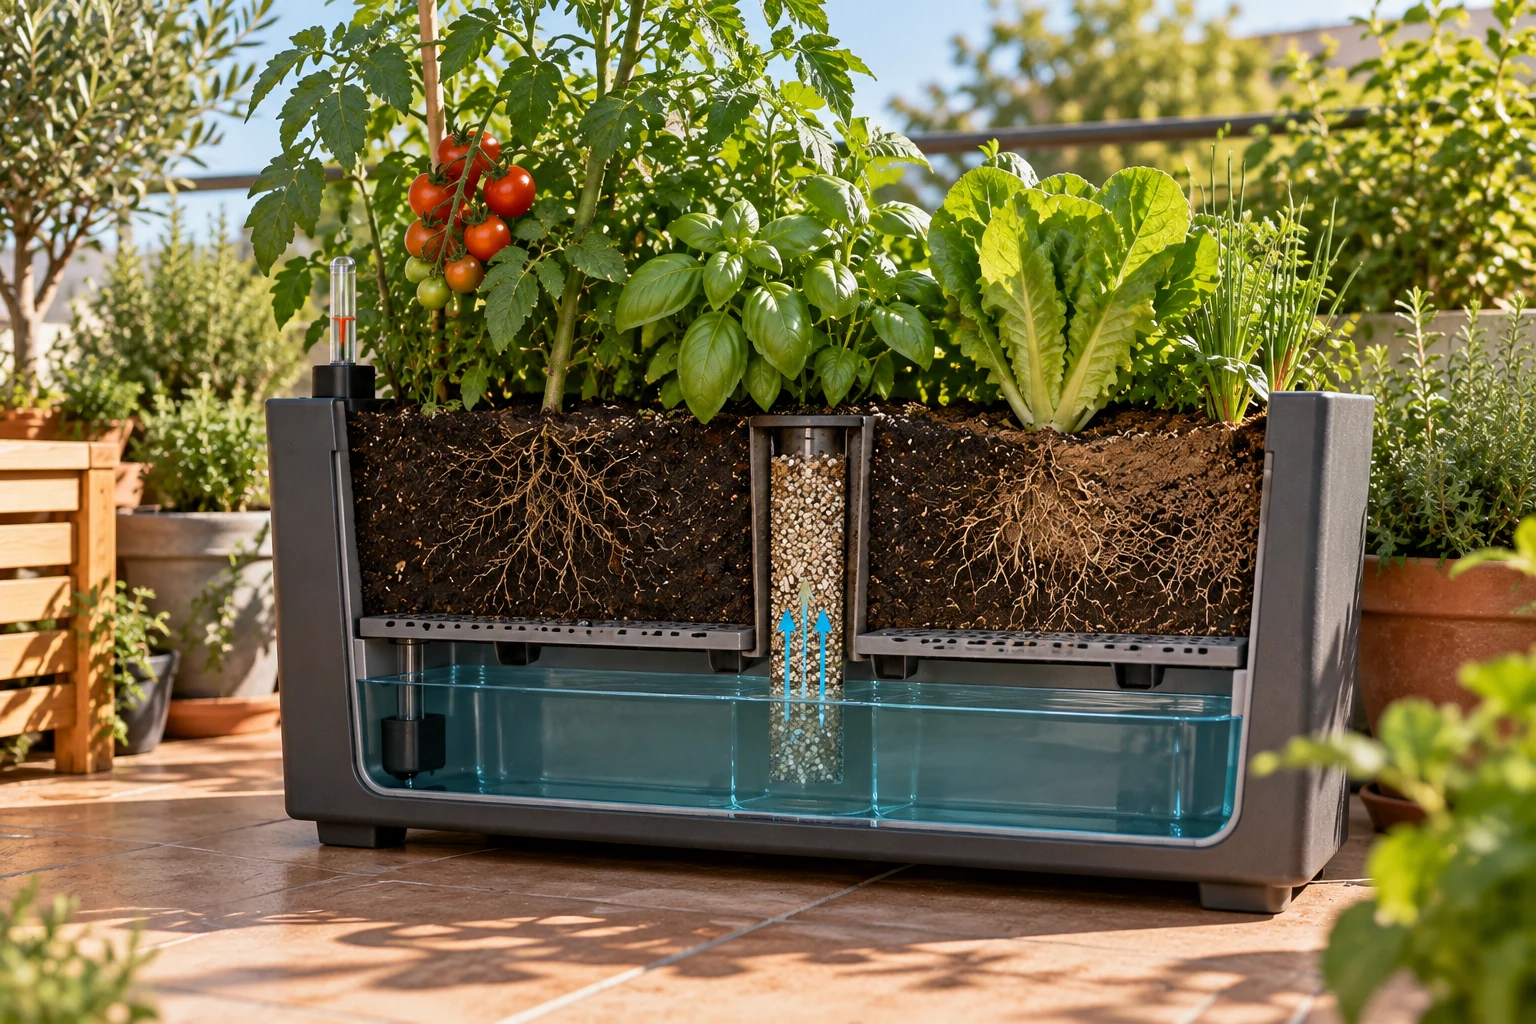
A self-watering planter can have a full reservoir while the top of the growing medium looks dry. That does not automatically mean the system has failed. The surface is exposed to more air and radiation than the lower layers, while water is supposed to move upward from the reservoir by capillary action toward the root zone.
A useful diagnosis answers three questions: is there a physical connection between reservoir and growing medium, can the medium absorb water in its current condition, and is moisture reaching the depth where roots are active?
This guide follows that sequence.
Quick diagnosis
If the reservoir contains water but the medium looks dry:
- 1. Do not judge the surface alone; check moisture several centimetres below it.
- 2. Confirm that the wick, soil column or capillary insert actually contacts the water.
- 3. Confirm continuous contact between the wick material and the main growing medium.
- 4. If the mix dried completely, re-moisten it from the top to re-establish capillary continuity.
- 5. Check whether the mix is too hydrophobic, coarse or unsuitable for the planter design.
- 6. Verify that the reservoir gauge is not stuck or misleading.
- 7. Check the overflow and reservoir geometry before simply adding more water.
1. Is the whole planter dry, or only the surface?
In a self-watering planter, water enters from below. The top layer can therefore be drier than the active root zone.
University of Maryland guidance recommends checking moisture below the surface before deciding that a container needs water. Virginia Tech also recommends inspecting several inches into the medium rather than relying on surface appearance alone. [S6][S9]
A simple check
Probe several locations with a finger, wooden skewer or manual moisture tool without damaging major roots.
- **Dry surface + moist middle:** the system may be working normally.
- **Dry surface + dry middle and lower zone:** there is likely a supply or capillary-continuity problem.
- **Very wet lower zone + persistently dry upper zone:** inspect medium properties, wick contact and capillary rise.
Do not diagnose the entire planter from one measurement point.
2. Understand the required water path

Self-watering containers commonly separate the growing medium from a water reservoir with a platform. Water moves through a physical wick, a soil-filled column, or sections of the growing medium that extend into the reservoir. Maryland and Illinois Extension describe this mechanism. [S1][S5]
For water to rise, a continuous path is needed:
reservoir water → wet wick material → connected moist medium → root zone
If one section is dry, separated or blocked, the reservoir can remain full while the upper medium receives too little water.
3. Check that the wick actually reaches the water
Depending on the design, the wick may be:
- rope or fabric;
- a soil-filled basket;
- a column of mix passing through the platform;
- a capillary cone or insert.
Check that the lower end reaches the reservoir, has not shifted, is not sitting above the water level, and remains in firm contact with the main growing medium.
Illinois Extension describes the growing medium in a lower basket as the wick that pulls water into the rest of the container. [S5]
4. Did the medium dry enough to break capillary continuity?
This is a major troubleshooting point.
Peat-containing media can become difficult to re-wet after excessive drying. Maryland notes that dry peat is hydrophobic and may initially repel water. Iowa State likewise warns that peat and coir can become hydrophobic when allowed to dry excessively. [S3][S4][S8]
In subirrigation systems, Arkansas Extension explains that top watering may be needed once to re-establish a capillary connection after it has been broken. [S7]
What to do
If the entire profile is dry:
- 1. fill the reservoir;
- 2. moisten the medium slowly from above;
- 3. use several passes instead of one heavy pour;
- 4. allow time for moisture to distribute;
- 5. check the following day whether reservoir level has fallen and the middle zone remains moist.
The purpose is not to convert the planter into a permanently top-watered pot. It is to restore a continuous wet pathway.
5. The growing medium may be the problem
A mix used in a self-watering planter needs a workable balance of:
- water absorption;
- capillary continuity;
- aeration;
- structural stability;
- compatibility with the reservoir and overflow design.
Mississippi State recommends soilless media suitable for containers and notes that wetting agents can improve wettability in subirrigated systems. [S2]
Warning signs
Very coarse or open mix: limited particle contact may restrict capillary rise.
Very compact mix: the lower zone may remain excessively saturated and poorly aerated.
Extremely dry, hydrophobic mix: it may initially reject water and fail to restore uniform wetting on its own.
Garden soil or heavy material: it may behave very differently from container media and should not be treated as an equivalent substitute. [S2][S3]
There is no single universal recipe that guarantees performance in every self-watering design.
6. Verify the actual reservoir level, not only the gauge
A float or level indicator is useful but can stick.
Before assuming water is available to the wick:
- move the indicator gently if the design allows;
- refill to the recommended level;
- observe the overflow when appropriate;
- inspect the reservoir directly if accessible;
- check whether roots, algae or debris interfere with the float.
A gauge reading “FULL” does not prove that water is actually touching the capillary element.
7. Inspect the overflow
The overflow establishes the maximum water level in many designs.
If it is too low, blocked, modified or incorrectly connected, the relationship between reservoir level and wick can change.
Maryland and Illinois include an overflow as a structural part of their self-watering designs. [S1][S5]
Do not block an overflow simply to “hold more water” without understanding the design; the planter may rely on an air space above the reservoir.
8. The reservoir level drops, but the plant still looks stressed
If water level decreases, water is being consumed or moved, but that does not prove the root zone is correctly supplied.
Check moisture at several depths, accessible root condition, planter temperature, sun and wind exposure, plant size relative to medium volume, and possible salt accumulation if fertilizer is added to the reservoir.
Wilting alone does not diagnose drought. Maryland notes that plants may wilt under both overly dry and overly wet conditions. [S9]
9. The reservoir level does not move at all
If the level remains unchanged for several days while the medium is dry:
- 1. verify the level manually;
- 2. inspect the wick;
- 3. inspect wick-to-medium contact;
- 4. re-moisten the medium from above;
- 5. mark the reservoir level;
- 6. recheck after 12-24 hours.
If nothing changes, disassemble only enough to inspect the capillary path.
10. Run a controlled check before replacing the medium
Instead of immediately emptying the planter:
- 1. mark initial reservoir level;
- 2. check moisture at three depths;
- 3. top-water once if the profile is completely dry;
- 4. wait 12-24 hours;
- 5. repeat the moisture checks;
- 6. record the change in reservoir level.
This helps distinguish between broken capillary continuity, a defective gauge, difficult-to-rewet medium and a local wick problem.
11. Should the reservoir always be completely full?
That depends on planter design, crop, climate and manufacturer instructions.
Do not interpret “self-watering” as “keep the reservoir permanently filled to the maximum” without checking how the system is designed. Some systems rely on an air gap and overflow to control the maximum water level.
For a commercial planter, its verified documentation should take priority over a generic rule.
12. When to suspect roots, sediment or salts
If a planter worked for months and gradually stops working, also inspect for:
- roots invading wick zones;
- sediment in the reservoir;
- biofilm;
- salt accumulation;
- degraded or compacted growing medium.
These problems require inspection, not simply more water.
Diagnostic decision tree

A. Is the middle root-zone medium moist?
- Yes → the dry surface may be normal; keep monitoring.
- No → continue.
B. Does the wick contact both water and growing medium?
- No → restore contact.
- Yes → continue.
C. Did the medium dry completely?
- Yes → re-moisten from above to restore continuity.
- No → continue.
D. Does the reservoir actually lose water?
- No → inspect gauge, wick and physical contact.
- Yes → inspect moisture distribution, plant demand and medium condition.
What to record
Before changing the planter, record:
- planter model or system type;
- wick type;
- growing medium;
- last reservoir fill date;
- starting and ending reservoir level;
- surface, middle and lower moisture;
- whether the medium recently dried completely;
- roots or sediment in the reservoir;
- temperature and exposure.
13. The system type changes what you should inspect first
Not every product labelled “self-watering” uses the same mechanism. Identifying the mechanism before intervention greatly reduces unnecessary testing.
Soil-filled basket or column
A portion of the growing medium extends into the reservoir. Failure is more likely if that column was poorly packed, lost contact with the upper medium or dried excessively.
Priority check: physical continuity from the wet lower column into the main root-zone medium.
Textile wick
A cord or strip transports water toward the growing medium. Check that it has not shifted, folded or separated from the area where it should release moisture. A wet wick that barely touches the medium may transport water without distributing it well through the container.
Capillary insert or cone
Some commercial planters use a dedicated component connecting the reservoir and medium. Follow the manufacturer’s placement and material instructions carefully. Replacing it with a part that only looks similar can substantially change capillary performance.
Platform with several contact points
Some designs allow multiple areas of medium to approach the reservoir through openings. A local problem can then affect only one part of the planter, so moisture should be checked at several locations rather than only near the fill tube.
14. A new planter and an old planter point to different causes
When the problem appeared is useful diagnostic information.
It never worked correctly
Prioritise:
- incorrect assembly;
- wick not reaching the water;
- completely dry medium used during setup;
- unsuitable mix;
- incorrectly assembled gauge;
- overflow level different from the intended design.
It worked until the planter dried out once
Prioritise:
- broken capillary continuity;
- peat or other medium that has become difficult to re-wet;
- shrinkage of the medium away from container walls;
- a wick that dried completely.
Maryland notes that excessively dried container media can shrink inward, allowing subsequent water to bypass the central root ball. [S9] In this situation, gradual rehydration is more logical than immediately adding new components.
It worked for months and slowly declined
Prioritise:
- medium degradation or compaction;
- roots invading wick or reservoir zones;
- mineral deposits;
- sediment;
- biofilm;
- deterioration of a textile wick.
The history matters: the same final symptom can have very different causes.
15. Use the moisture pattern as an image of the failure

Instead of asking only “is it dry?”, ask where is it dry?
Moist only around the wick
Water is reaching the capillary element but spreading poorly through the medium. Inspect structure and continuity of the mix.
Wet low down, dry near the top
This may be a normal gradient if active roots are inside the moist zone. A young transplant with roots still concentrated near the top may need temporary support from surface watering during establishment.
One side moist and the other dry
Look for uneven contact, compaction, an off-centre wick or differences in how the planter was filled.
Entire planter dry with a full reservoir
This pattern points most strongly toward actual water level, wick placement, physical contact or hydrophobic medium.
Recording the pattern in the included worksheet makes before-and-after comparison much more useful.
16. After transplanting, roots and the reservoir system may operate at different depths
A self-watering planter may keep lower layers moist while a newly transplanted plant still has most of its roots near the top.
During establishment:
- check moisture where the transplant root ball actually sits;
- do not assume a full reservoir guarantees moisture around young roots;
- use temporary top watering if the planter instructions allow it;
- reassess after roots have colonised more of the container.
This does not contradict reservoir watering. It simply recognises that the plant may not yet occupy the zone that the capillary system wets most effectively.
17. What not to do during diagnosis
Avoid changing several variables at once. If you replace the medium, add extra wicks, block the overflow and keep the reservoir at a new level simultaneously, you will not know which change fixed —or worsened— the problem.
A clean troubleshooting process changes one variable at a time:
- 1. measure;
- 2. correct one likely cause;
- 3. wait a reasonable interval;
- 4. measure again;
- 5. record the result.
Do not add household detergents or improvised surfactants to “fix” hydrophobic medium. Horticultural wetting agents have specific formulations and application rates; this guide does not recommend improvised chemistry in the root zone.
18. When it is worth emptying and rebuilding the planter
Full disassembly should be one of the later options because it destroys the pattern you are trying to diagnose and can damage roots.
It may be justified when:
- the wick is inaccessible and you strongly suspect it never reached the reservoir;
- there is a structural blockage;
- the medium is severely degraded or compacted;
- roots have invaded the mechanism and the product is designed to be serviced;
- the reservoir contains deposits that cannot be removed otherwise.
Before dismantling, photograph the setup and record water level and moisture pattern. That evidence helps you rebuild without repeating the same fault.
FAQ
Is a dry surface normal?
It can be. Moisture should be checked within the root zone rather than by surface appearance alone.
Should I top-water a self-watering planter?
It can be useful during establishment or to restore capillary continuity after excessive drying. Afterwards, follow the intended operation of the specific design.
Why is there water below while dry peat stays dry?
Very dry peat can become hydrophobic and difficult to re-wet. Gradual re-moistening can help restore contact.
Can I add more wicks?
Only if the planter design allows it and you understand how it will affect moisture distribution. First verify that existing wicks make proper contact and that the medium is appropriate.
Can the reservoir gauge be wrong?
Yes. A float can stick or fail to reflect whether water is actually reaching the capillary element.
Can I use ordinary garden soil?
Extension sources consulted for this package favour lightweight container media and caution against heavy or unsuitable materials in subirrigated systems.
Conclusion
A full reservoir with dry growing medium does not have one universal cause. The most efficient diagnosis follows the physical path of water:
reservoir → wick → contact → growing medium → root zone.
First determine whether the apparent dryness is only superficial. Then verify capillary continuity, re-moisten an excessively dried profile when needed, and evaluate the growing medium before replacing components at random.
Technical sources
- University of Maryland Extension: Self-Watering Containers
- Mississippi State University Extension: Subirrigated Containers for the Mississippi Gardener
- University of Maryland Extension: Growing Media (Potting Soil) for Containers
- University of Maryland Extension: Starting Vegetable Seeds Indoors
- University of Illinois Extension: Self-Watering Container Directions
- Virginia Tech: Identifying Water Stress in Container-Grown Plants
- University of Arkansas: Irrigation Systems & Water Quality
- Iowa State University Extension: Potting Media: Components and Handling
- University of Maryland Extension: Growing Vegetables in Containers and Salad Tables